A little more about Stainless
This again is a section for Stainless Info only all the items for sale will be in the shop section. There is not enough room for all the descriptions there. I suppose this is similar to a blog. There are several different types of sight glasses listed on the site mostly these are stainless steel. Some have been specially made to my designs as it is almost impossible for the amateur to use stainless steel to fabricate items. I have some items here that are stainless steel but have been welded to copper so we can simply solder them into our copper pipe designs.
I know they are not cheap but someone else has done the hard bit so we can do the easy bit. You will be able to make your own 54mm Copper Hill Billy Flute Still as well as fitting a sight glass to almost anything. I also have a few 50L pots that can be fitted with electric heating elements and sight glasses. These pots make nice stills. The possibilities are endless it is your imagination that is the limit. Please ask before you order as I do not always get around to updating things.
It is going to take a while to get it all listed. (Stainless)
Distilling Sight Glass.
Alcohol distilling. Grade SS 304 Sight Glass Flow Sight Glass. The maximum working pressure of these glasses is 1 MP ( Megapascal ) = 10 Bar. This does not apply to the Tower Sight Glasses these are rated at a maximum of 0.5MP ( Megapascal ) = 5 Bar.
These units are heavy-duty units with care thay will last a lifetime.
With the use of a gasket, the bubble plates and sieve plates can be used effectively.
I now have a small stock of these towers in the UK.
This includes 2”, 2.5”, 3”, and 4” Stainless Steel Tri-Clamp Sight Tower /Glass.
Height wise there is nothing much between 4″ is 18cm tall 3” 2.5″ & 2″ are all 17cm tall give or take an mm or 2.
Heavy-duty units. Max MP 1.
They are heavy-duty units made to last and as such are literally heavy. All fit the standard tri-clamp of the measurement stated.
i.e. if you purchase a 2” tri-clamp glass it will fit the 2” tri-clamp ferrule and it will fit the 2” tri-clamp Clamp and so on.
Most of these types of items are made in the PRC as are a lot of the things I have for sale. We cannot compete with their labour costs.
The difference is
The difference is, the items I have for sale are no longer there in China. They are here in the UK just a few days away.
They were sourced by my very good friend who is Chinese he lives and works in this industry in China. Thus speaks and understands his language but a very big but above all has a very good command of the English language.
We have a long and very good relationship. This in turn allows me to purchase things that would otherwise not be available to us westerners. If he thinks the quality is not up to standard he does not purchase it on my behalf. This ensures good quality.
He also gets me specially-made items that are not available anywhere else. They include such items as the Flanged sight glass and the Tri-Clamp sight glass the Threaded sight glass. This comes at a premium price, if you want something a little different it costs a little bit more. Not hundreds as it would here but just a few dollars. The only fly in the ointment is the exchange rate at this moment in time. It is making it very expensive to import. This in turn makes profit margins very tight.
Borosilicate Glass
Please be aware that Borosilicate Glass is very tough stuff, it can have floors and air entrapment in the glass, as well as this, it can have small chips on the edges of the glass due to the manufacturing/cutting and cleaning/polishing processes. This is not a product flaw, but a characteristic caused by natural production processes. A small air pocket near the edge or a slight knock will lead to this phenomenon.
Please handle items made of Borosilicate Glass with the utmost care, do not do clamps up too tight, and do not put them down onto hard or especially hard rough surfaces. Do not clamp it directly to a metallic surface. Also do not subject the glass to large temperature shocks. All glasses are inspected by us before they are sent out. Small edge chips are nothing to worry about. It will not get any larger and will not affect the sealing ability, provided the correct gaskets are used. These small chips can be filled with the appropriate super type glue or PC Clear liquid epoxy or similar and polished out with care and a Dremel-type tool. ( Other makes available )
We can not accept subsequent complaints about edge chips. The item is wrapped carefully when sent to post. However, if you are not happy with the glass please send it back and I will refund your purchase. Thank you for your understanding. Please also be aware that carriers will not insure glass. Items are sent at the buyer’s risk.
For information please see– http://www.repairproducts.co.uk/page39.htm
Distillers Corrugated Stainless Steel Pipe
Here we have a unique piece of equipment I only have one size ( 16mm ) as it is the most common and user-friendly size.
This size is suitable for Wort Chilling or Warming it will also fit into a 54mm pipe when wound around itself to make a Vapour Cooling Coil. All in all a very useful item. Another feature of this pipe is that if you are not happy with the shape you can change it. Just straighten and reform it. This is also a very handy plumbing aid as it can be used for connecting things in awkward places where normal pipework is difficult to fit. i.e. under sinks and baths etc. The ends are sold in pairs. This comprises a Circlip, a Silicone Washer, a Male Brass Nipple, and a Stainless retained nut. If you purchase the ends and would like me to fit them I will fit the ends FOC for you as they need a special fixing tool.
The reason for the brass nipple as opposed to the standard stainless nipple is that you can solder to brass hence the copper 15mm to 10mm reducer or a 15mm end feed fitting can be soldered directly to the brass fitting. This makes it even more flexible as to where and how it can be used. I have a few of the end fixing tools for sale along with the pipe cutters. ( Steel Pipe )
Keg Adaptors.
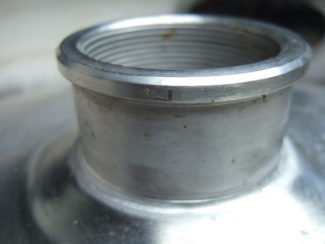 This is the top you are looking for.
I make various adaptors to fit the standard keg top. These are all based on a Copper ferrule. This includes such things as a plain 54mm copper pipe of about 100mm in length a 35mm long pipe with a couple attached so you can drop your column into it. There is also a 2.5” to 2” / 54mm one. If you would like a different size please ask. Most kegs whether they are 100lt or 50lt have the same size top.
This is the top you are looking for you are unlucky and get one with the triangle top it will need to be cut off and a stainless steel ferrule welded in place. When sourcing your keg purchase or otherwise take special note of the top. You need the ones with a lip on the top that a tri-clamp will fit. ( See photo. ) The adaptors are all made in copper and can be found in the copper section.
The Stainless Steel Keg Adapters are brazed onto the copper coupler and as such sometimes leaves burn marks on the Ferrule. This does affect the way the ferrule works or the seal you get. It’s just an aesthetic thing.
Tri Clamps
I have a selection of tri clamps. Mostly they are the 2” 54mm or as the clamp size goes 51mm ???
Sizes are 2” 2.5” 3” and 4” Most of us are into the 2” / 54mm size of pipe.
Not much else you can say about a Tri-Clamp or Tri Clove as some call them.
I have a few heavy-duty 2” tri clamps. These are especially useful for the top of the keg as they are about 1.5mm larger than the standard clamps. They are a bit more expensive but well worth it as they allow a standard tri-clamp washer / ‘O’ ring/seal to be used. I only have 5 and when they are gone that will be that. I am also restricting them to one per customer to be as fair as possible. One keg requires one clamp. Other connections are suited to the standard tri-clamp.
The standard 2″ clamp weighs in at 171grams. The HD clamp weighs in at 244grams.
Price £8.65 + p&p.
They are for sale in the SHOP under Stainless Steel.
Tri-Clamp Butterfly Valve
I say 2” for the 54mm when you look at the various others they say 51mm. Tri Clove, Tri-Clamp. Anyway this is for the 54mm / 2”/51mm tri-clamp ferrule. The ferrule can be copper, brass or stainless steel makes no difference.
If using 54mm copper pipe you will need the 2” tri-clamp fittings. These valves are absolute top quality valves. They are a first-class item. They will empty your still etc. in no time.
I cannot believe the price for such an engineered item.
They have various stops to set the valve at. The handle is spring-loaded so that you can set it in the pre-formed hole stops. Pull the handle back twist to position and release. This will allow outflow and inflow at a determined rate. It is put together with a nut and bolt system so it can be easily taken apart for maintenance.
All in all a very nice well-engineered piece of equipment. 2” only I’m afraid. If this item was made in the UK it would cost well over £100 and it would not surpass the quality of this item.
Enough enquiries and I will ask my friend for some prices for larger ones. ( SHOP )
An idea as to what the equivalent sizes are in DN (Diameter Nominal ) Inches and OD (Outside Dimension) of the pipe or thread.
See also Q&A
DN Inch OD
- 6 ⅛ 0.405 in (10.29 mm)
- 8 ¼ 0.540 in (13.72 mm)
- 10 ⅜ 0.675 in (17.15 mm)
- 15 ½ 0.840 in (21.34 mm)
- 20 ¾ 1.050 in (26.67 mm)
- 25 1 1.315 in (33.40 mm)
- 32 1¼ 1.660 in (42.16 mm)
- 40 1½ 1.900 in (48.26 mm)
- 50 2 2.375 in (60.33 mm)
- 65 2½ 2.875 in (73.02 mm)
- 80 3 3.500 in (88.90 mm)
- 100 4 4.500 in (114.30 mm)
- 150 6 6.625 in (168.27 mm)
LITRES = PINTS QUARTS IMP GALLONS
1 1.76 6 = 5.6lts = 1.3
2 3.52 8 = 1.6lts = 1.5
3 5.28 12 = 11.3lts = 2.4
4 7.00 15 = 14.2lts = 3.1
5 8.80 16 = 15.1lts = 3.3
6 10.56 18 = 17.0lts = 3.7
7 12.32 18.5 = 17.5lts = 3.86
8 14.00 20 = 19 lts = 4.1
9 15.80 25 = 23.6 lts = 5.2
10 17.60 30 = 28.4 lts = 6.24
11 19.35 35 = 33.1 lts = 7.28
12 21.12 40 = 37.8 lts = 8.32
14 24.60 50 = 47.3 lts = 10.40
16 28.16 60 = 56.7 lts = 12.49
18 31.68 70 = 66.2 lts = 14.5
20 35.20 80 = 75.7 lts = 16.7
25 43.20 90 = 85.1 lts = 18.7
30 52.00 100 = 94.6 lts = 20.8
35 61.00
50 88.00—————11 Imp Gallons In Stock Pots
71 125.00————–15.6 Imp Gallons In Stock Pots
98 172.00————–21.6 Imp Gallons In Stock Pots
All measurements are approximate but are within a nats.
Stainless Steel Ferrules.
2″ 2.5″ 3″ & 4″. 2″ Fits the 54mm Copper Pipe. 2,5″ Fits the 67mm Copper Pipe. 3″ Ferrules have been specially machined to fit the 76mm Copper pipe. Most if not all 3″ ferrules are the same size as the pipe and as such have to be used with a coupler. Not any more, these 3″ 76mm ferrules actually fit inside the pipe. 4″ Fits the 104mm Copper Pipe. Again these ferrules are here in the UK just a few days away not weeks away.
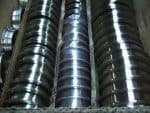 Stainless Ferrules just as they arrived.
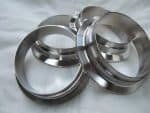 Steel Ferrules 3 inch specially machined.
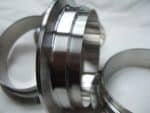 Stainless Steel Ferrules 3 inch / 76mm suits 73mm ID copper tube.
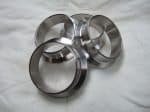 Stainless Steel Ferrules 2 inch/54mm suits 51mm ID copper tube.
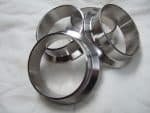 Stainless Steel Ferrules 2.5 inch/ 64mm suits 67mm ID copper tube.
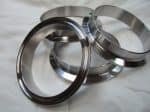 Stainless Steel Ferrules 4 inch /108mm suit 104mm ID copper tube.
Lid Clips
These are a very useful items used in conjunction with the Silicone Pot Rim Seal. These clips are a good size for making the seal around your pot.
They are approximately 120mm in length and have a 23mm handle to 33mm wide spring clip end. They are suitable to be riveted in as I do with copper rivets
or they can be fitted with brass or stainless nuts and bolts. Do not use standard metal nuts and bolts.
I have found that the best way to fit them is to mark the holes on the side of the clip. Place the lid on the pot. Hang the clip from the lid down the side of the pot.
Mark the holes in the pot. Drill your holes with a drill speed as slow as it will go. Use water to cool the drill bit. Best if you have someone to hand to work the water.
Water works better than oil. When it starts to steam or before apply more water. No need for special drill bits if you keep it cool.
Silicone Seal
The Silicone Seal I have is a food-safe item. It can be fitted around the rim of your pot and where to two ends meet place a squirt of food-safe silicone on the
rim of the pot. But the ends together place a piece of something non-stick over the joint, I use masking tape. Put the lid on the pot and clamp down with your newly fitted clips. Leave for about 24Hr to cure. This will make a good seal with no leaks. If and when it gets disturbed just repeat the process. The fact is silicone does not stick to silicone. I always make the joint correspond to where a clip is situated. I think it’s called hedging your bets.
( SHOP )
Keg Top Flanges.
At long last, they are here. Due to a customs hiccup, they took a month to get here. Unfortunately, the manufacturer did not grasp the situation quite fully and did not weld the nuts and bolts as I had asked. When informed of this they wanted almost as much to do that as they charged to do the job in the first place.
I am not a welder. I have tried. If you or a friend can weld stainless steel then by all means weld the flange to the keg.
I can supply everything in a kit form and you can do your own or get a friend to do it. These are a little fiddly to fit the first time you do it but you soon get to grips with the best way of doing it.
The beauty of this is that the hole you cut in the top of the keg is about 4.0″ or 4.5″ depending on the footprint of your jigsaw. You can then get your arm in the keg to fit other items such as tap nuts, electrical element nuts, etc. Plus you are able to clean the inside. Don’t forget to de-burr any holes you make, failure to do so could come back and bite.
To fit the Flange you will need to cut a hole in the top of the keg. Make sure you have degassed it. No need to remove the spear as it will come out anyway. First drill a hole that will allow you to get a jigsaw blade in. I can supply the S.S. Blade for £4.00 if bought at the same time. Use the top spear adaptor/neck the bit that sticks up as a guide for the jigsaw see Keg Adapters in this section. Just run the jigsaw around the top of the keg using the spearhead as a guide. Put the jigsaw on the lowest slowest speed it will do. Get a friend to do it or yourself with a water spray bottle to continuously spray the blade so it does not get hot. Next, after the hole is cut place the outside of the flange with the stainless ferrule on the center over the hole. Mark the holes. Centre punch the marked holes so the drill does not wander. Put the drill on as slow as it will go. Then squeeze the trigger to half the slow speed of that setting or less. Squirt water all the time you are drilling.
The nuts and bolts are 8mm. You need to make the holes about 9.0 to 9.5mm to allow for movement and miss alinement. With stainless steel, everything needs to be done at a snail’s pace. SS – Stainless Steel = Snail Slow. If you make it too hot it just gets harder and far more difficult to work with. Cool and slow. Hot and fast you don’t get anywhere, only frustrated. Ignore the folks that tell you to use some sort of oil. Water is the best for coiling. You can’t see when oil is getting hot until it has got so hot it starts to smoke. The damage is done by that time. You have effectively hardened the steel. Water is by far the best way to go when the first wisp of steam appears, stop or just squirt more water. Works a treat. As the saying goes slowly, slowly, catchy monkey. Fast and furious just F***s it up.
 Cut the Hole in Keg
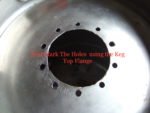 Smooth the edges of the hole so they do not come back to bite you.
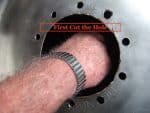 Cut your hole about 120mm in Ø & smooth the edges
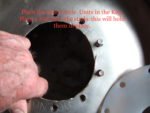 Mark and drill the holes using the adapter as a template.
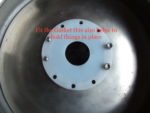 After fitting the inner rings fit the Gasket using a couple of nuts
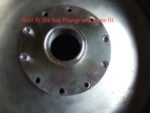 Loosely fit the Flange
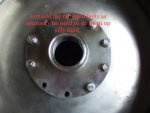 Continue adding fixing until they are all in position before tightening
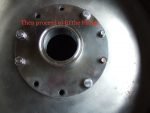 Add the nuts and bolts as you go
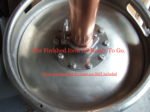 This is how the completed Flange should look when complete
( Shop )
Stainless Steel Flange
Tips on fitting the Flange. Not to be confused with the Keg Top Flange.
A little help if you intend to fit this item from the outside of a tank, keg etc. With no access to the inside of the said item.
Grind a flat spot on opposite sides of the flange about halfway through the flat shoulder of the flange.
Hold the flange in the centre of the cut hole in the receptacle and mark where the flat spots are on the flange onto the tank etc. Carefully file these out to be an exact fit so that the flange will pass through the hole and the slots.
Pass the flange through the hole being careful not to drop it. Rotate the flange so that the flat shoulders are in an opposite position to the fitting places. This will ensure a good leak-free fit.
Note that the position of the slots wants to be just above or below the centre depending on your preference. If the item is a cylindrical item the slots are best made horizontal. Above all keep the hole tight and precise.
If you have complete access to your item then just ignore all of the above.
Foot Note
Another thing worth remembering is that some of the internal threads are a bit generous or the item being fitted may have a loose thread. In this case, a good helping of Gas PTFE tape will save the day. Another good thread seal to use is some thread string. i.e. Loctite Thread Cord is even better than gas tape.
Good Luck and enjoy the fruits of your labours.
Stainless Steel Brew Pots or Stills.
These are what you make them. They make nice Brew Pots / Mash Pots / Tuns. They also make a nice Still. This in turn can be fitted with all the usual attributes such as elements, drain taps, thermometers, sight glasses, lid clips, seals, etc. Another advantage is they are a lot easier to work with and keep clean than beer kegs. The lids on these pots have a single center screw so there is no welded-on handle to remove. The center where the handle fits the lid is an ideal size for a 54mm copper pipe union that will take a 54mm copper still pipe so you are off to a flying start for making a still.
The only thing I would say just as a safety measure is although the handles are spot welded on I would not trust them on pots this size, when they are full of a hot liquid, fit a tap so you can drain them down before you move them. As a by the by a 50L pot with 35L of liquid in comes out at 37Kg as 1Lt of water weighs in at 1Kg + the weight of the pot.
I have only bought a few to see how they go. I will not be buying any more. They would be better collected but if this is not an option I will post them. P&P will be around the £20.00 mark.
Unfortunately, these pots have not turned out to be what I was expecting when I purchased them. They are thin wall pots. Ok easy to work but not the best quality.
5/. 33L @ £55.00 each + P&P Measurements are 40cm High x 40cm in diameter.
5/. 50L @ £65.00 each + P&P Measurements are 45cm High x 45cm in diameter.
3/. 71L @ £75.00 each + P&P Measurement are 50cm High x 50cm in Diameter.
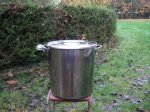 Stainless Steel Brews
50L, 71L,
( Shop )